
Managing data
In this chapter you learn how to manage caves, configure survey instruments, and enter and import survey data. This is the basis for all further work in CaveRenderPro.
Managing caves
Adding a cave
- Click on the tab Caves
- Click on Caves → Caves → New
- The dialog Cave Data opens
- Enter the following data:
- Register: register number
- Cave: alphanumeric cave number
- Name: cave name
- Info: information about the cave
- Click OK to save the cave
Selecting a cave
In the cave table you can select caves:
- One cave: simply click on it
- Several caves: with
Ctrl+clickorShift+click - All caves:
Ctrl+A
Cave data
Entering entrance coordinates
For each cave you can define the entrance coordinates:
- Select the cave in the cave table
- In the dialog Cave Data you find the following fields:
| Field | Description | Format |
|---|---|---|
| Latitude | Geographic latitude (WGS84) | d, d°m, d m, d°m's or d m s |
| Longitude | Geographic longitude (WGS84) | d, d°m, d m, d°m's or d m s |
| Elevation | Height above sea level | Metres (e.g. 1245) |
| UTM Zone | UTM grid zone | Longitude zone (1-60), latitude zone (C-X) |
| Easting | UTM X coordinate | Metres |
| Northing | UTM Y coordinate | Metres |
Pasting coordinates from the clipboard
You can copy coordinates quickly from other places:
- From the datasheet: select a record → Caves → Coordinates → Copy
- From the line views and the map view: click on a survey station → right-click → Coordinates
- From the map view: centre of the map → Caves → Coordinates → Copy
Then paste them:
- Open the cave
- Caves → Coordinates → Paste
- The coordinates are inserted into the cave automatically
Further cave data fields
Administration and information
| Field | Description |
|---|---|
| Register | Register number of the cave |
| Connection | Display the connection icon |
| Info | Information about the cave |
| Description | Detailed description of the cave |
| QR-Code | Text and URL for the QR code |
Magnetic declination and elevation model
| Field | Description | Unit |
|---|---|---|
| Date | Date of the declination value | Date |
| Declination | Magnetic declination (IGRF-14 model) | Degrees |
| Change | Annual change of the declination | Degrees/year |
| Meridian | Meridian convergence for UTM coordinates | Degrees |
| Elevation (DEM) | Elevation according to the OpenTopoData elevation model | Metres |
Extended and projected profile settings
| Field | Description | Unit |
|---|---|---|
| Offset Extended | Horizontal displacement of the entrance in the extended profile | Metres |
| Azimuth Extended | Viewing direction for the extended profile | Degrees |
| Offset Profile | Horizontal displacement of the entrance in the projected profile | Metres |
| Azimuth Profile | Viewing direction for the projected profile | Degrees |
Entering survey data
Opening the datasheet
To enter and edit survey data:
- Click on the tab Data (or
Ctrl+D) - You see the datasheet with all survey data
- To edit: double-click on a cell
Types of records
There are three types of records in CaveRenderPro:
| Type | Description | Example |
|---|---|---|
| Survey shots | Survey data between two survey stations. The station has a passage number and a station name. | Passage 1, station 2 → passage 1, station 3 |
| Splays | Used to depict the dimensions of the passage (LRUD). They have no station name. | LRUD measurements (left, right, up, down) |
| References | Define anchor points with absolute coordinates. Passage = RefPassage, station = RefStation. | Cave entrance with GPS coordinates |
Important data fields
The most common fields when entering data:
| Field | Type | Description |
|---|---|---|
| Cave | Text | Cave number (is filled in automatically) |
| RefPassage / RefStation | Text/number | Reference point the survey shot starts from |
| Passage / Station | Text/number | Target point of the survey shot |
| Length | Decimal | Distance in metres (e.g. 23.45) |
| Azimuth | Decimal | Compass bearing in degrees (0-360) or gon (0-400) |
| Inclination | Decimal | Angle of inclination in degrees (-90 to +90) |
| Instrument | Number | Instrument number (must be defined in the properties) |
| Date | Date | Survey date (for the declination calculation) |
Further data fields
Length measurement (Topofil, dive depth)
| Field | Description |
|---|---|
| Start | Start value for length measurement with a Topofil |
| End | End value for length measurement with a Topofil |
| Depth | Dive depth for sumps (metres) |
Hull and LRUD
| Field | Description |
|---|---|
| Hull | Depiction of the station in the 3D hull and the 2D area (0=auto, 1=LRUD, 2=convex hull, 3=concave hull) |
| LRUD | LRUD type (0=auto, 1=bisection, 2=acute angle, 3=perpendicular, -1=bisection vertical, -2=acute angle vertical, -3=perpendicular vertical) |
| Left | LRUD to the left (metres) |
| Right | LRUD to the right (metres) |
| Up | LRUD upwards (metres) |
| Down | LRUD downwards (metres) |
Advanced settings
| Field | Description |
|---|---|
| Direction | Direction for the extended profile (left=0) |
| Weight | Weight for the adjustment (-1=station fixed, 0/empty=normal, 0.5=half as accurate, 1=normal, 2=twice as accurate) |
| Loop (deprecated) | Loop number for the loop closure (the direction is determined automatically) |
| Colour | Colour number for the depiction of the survey shots |
| Level | Level number for the survey shot filter |
| Surveyor | Surveyor number (see Properties - Surveyors) |
Titles and information
| Field | Description |
|---|---|
| Title | Title of the survey station or of the survey shot |
| Info | Information about the record |
| Material | Material of the survey station |
| Tasks | Tasks / to-do list |
| Comment | General comment on the record |
Coordinates and connections
| Field | Description |
|---|---|
| RefCave | Cave number for connections between caves |
| RefX, RefY, RefZ | X/Y/Z coordinates of the reference point (calculated) |
| X, Y, Z | X/Y/Z coordinates of the survey station (calculated) |
Search and replace
Two groups in the tab Data change values in several rows at once. Both act only on the selected rows of the datasheet.
Survey Station
- Search – jumps to the survey station you are looking for
- Passage and Station – the two fields for the new station name
- Replace – sets the survey station in the selected rows
Values
- Column – the column in which the replacement takes place
- Value – the new value. A double-click in the field opens a selection list, for example for LRUD, instrument, level and surveyor; for date fields a calendar appears
- Replace – writes the value into the selected rows
These columns are available:
| Column | Value | Effect |
|---|---|---|
| Passage | Integer | Sets passage and reference passage to this number |
| Passage +/- | Integer, negative values allowed | Shifts passage and reference passage by this amount |
| Instrument | Instrument number | Assigns the survey instrument |
| Survey shot <-> | — | Reverses the survey direction: station and reference point are swapped, the azimuth is turned by 180° or 200 gon, and the inclination is adjusted accordingly |
| Hull | 0–3 | Depiction in the 3D hull and the 2D area |
| LRUD | 0–3 or -1 to -3 | LRUD type |
| Direction | Number | Sets the direction for the extended profile. If the sign changes, the splays are turned as well |
| Direction <-> | — | Reverses the direction, including the splays |
| Direction azimuth | Azimuth, optional | Calculates the direction from a viewing direction: survey shots deviating by more than 180° get -1, the others 1; splays proportionally. Without an entry the section angle of the cave applies |
| Weight | Decimal number | Weighting for the adjustment |
| Loop (deprecated) | Integer | Loop number for the loop closure |
| Colour | Colour number | Colour number from the properties |
| Level | Level number | Level for the survey shot filter |
| Date | Date | Survey date; a double-click opens the calendar |
| Surveyor | Surveyor number | Assigns the surveyor |
Dive depths for sumps
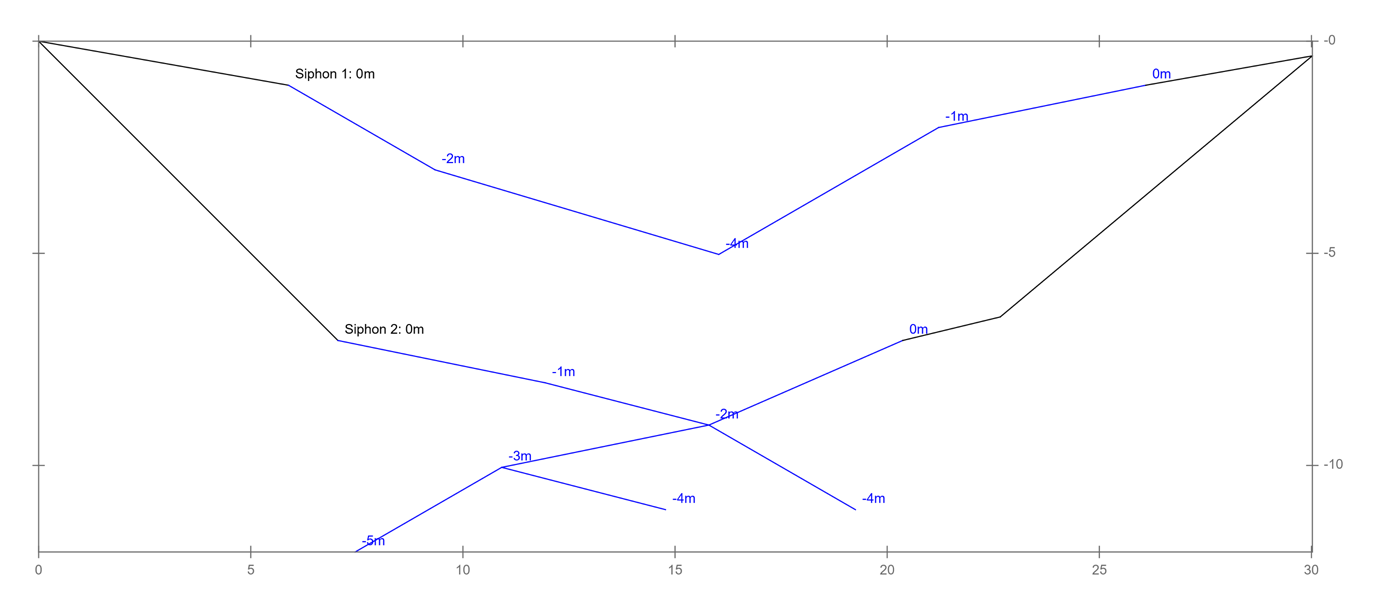
Dive depths are a special case for sumps and underground water bodies. They are entered in the column Depth.
How dive depths work
- Relative values: dive depths are defined relative to the water surface
- Negative values: below water = negative (e.g.
-4m= 4 metres below the water surface) - Positive values: above water = positive or 0 (e.g.
0m= at the surface,2m= 2 metres above the water)
Rules for surveying sumps
Important: the survey shots inside a sump must be contiguous and marked correctly:
| Situation | Depth value | Example |
|---|---|---|
| All survey shots of a sump | Negative (e.g. -1, -2, -4) |
Sump with 3 survey shots, all of them below water |
| Survey shots must be contiguous | Uninterrupted between the entry into and the exit from the sump | 1 → 2 → 3 → 4 (all with negative values) |
| Separation between two sumps | Neutral/zero (0m) |
Survey shot without a dive depth between sump 1 and sump 2 |
| Outside a sump | Zero or empty (0m or nothing) |
Normal survey shots in a dry passage |
Practical example: two sumps in one cave
Your datasheet could look like this:
| Passage | Station | Length | Depth | Comment |
|---|---|---|---|---|
| 1 | 1 | 10.5 | 0 | Entrance, no water |
| 1 | 2 | 15.3 | 0 | Before sump 1 |
| 1 | 3 | 8.2 | -2 | Start of sump 1 (2 m below water) |
| 1 | 4 | 6.5 | -3.5 | Middle of sump 1 (3.5 m below water) |
| 1 | 5 | 7.1 | -1 | End of sump 1 |
| 1 | 6 | 12.4 | 0 | Separation: between sump 1 and 2 |
| 1 | 7 | 9.8 | -1.5 | Start of sump 2 |
| 1 | 8 | 5.3 | -2 | End of sump 2 |
A sample file Demo Tauchtiefe.xml is included.
Configuring survey instruments
Defining instruments
For every survey campaign you need at least one configured instrument:
- Go to File → Properties → Instruments
- Right mouse button → New
- Fill in the following fields:
Instrument parameters
| Parameter | Description | Example |
|---|---|---|
| Instrument | Unique number for the instrument | 1, 2, 3... |
| Title | Name or model of the instrument | DistoX2, compass+clinometer |
| Divisor | For length measurement with a Topofil: length = (end - start) / divisor | 0 (no calculation), 100 |
| Sag | Sag for length measurement with a tape measure or a thread (per cent) | 0, 1, 2, 5 |
| Azimuth | Angular unit of the compass: degrees (360°) or gon (400g) | Degrees (default) |
| Inclination | Angular unit of the clinometer: degrees (360°) or gon (400g) | Degrees (default) |
| Orientation | Zero point of the clinometer: zenithal = 0 at the top, horizontal = 0 horizontal, nadiral = 0 at the bottom | Horizontal (default) |
The exact length of the survey shot is determined from the sag with the help of the catenary function:
- 1 % sag → survey shot up to 0.3 % shorter
- 2 % → 0.6 %
- 5 % → 1.6 %
- 10 % → 3.2 %
- 20 % → 6.1 %
Setting the declination
The declination corrects the difference between magnetic north and geographic north:
- Declination: value in degrees or gon
- Date: date of the declination value
- Change: annual change of the declination
The exact declination is calculated to the day for every survey shot from its survey date and these three values.
Example: declination 5°, date 01/01/2014, annual change 1°
For a survey shot from 01/07/2016 with an azimuth of 40°:
40° + 5° + 2.5 years × 1° = 47.5°
Data import & export
Importing data
Import from a table format
Caves → Import → Survey Shots
Import data from Excel or CSV files. All survey shots of the caves concerned are overwritten!
Mandatory fields for survey shots:
- Cave, RefPassage, RefStation, Passage, Station, Length, Azimuth, Inclination, Instrument (must be defined)
Mandatory fields for calculated coordinates:
- Cave, RefPassage, RefStation, Passage, Station, Instrument (not defined), RefX, RefY, RefZ, X, Y, Z
Import from other programs
Caves → Import → Survey
CaveRenderPro recognizes the format automatically:
| Program | Format | File type |
|---|---|---|
| Compass | *.txt ("Project File" or "Survey File") | TXT |
| PocketTopo | *.txt ("360)" or "400)") | TXT |
| Qave | *.cave ("prefix:") | CAVE |
| SexyTopo | *.txt ("TRIP") | TXT |
| Therion | *.th ("encoding" or "survey") | TH |
| TopoDroid | *.csv ("TopoDroid") | CSV |
| Toporobot | *.text (" -6") | TEXT |
| VisualTopo / CaveSurvey | *.tro ("Version") | TRO |
| Walls | *.srv | SRV |
A sample file is included for every format: Daten Compass.txt, Daten PocketTopo.txt, Daten Qave.cave, Daten SexyTopo.txt, Daten Therion.th, Daten TopoDroid.csv, Daten Toporobot.text, Daten VisualTopo.tro and Daten Walls.srv.
Exporting data
The group Caves → Export offers the following functions for the selected caves:
| Function | Description |
|---|---|
| Caves | Export of the cave data (table) |
| Survey Shots | Export of the survey shots (table) |
| Surveyors | Export of the surveyor data (table) |
| CaveRenderView | Export for CaveRenderView |
| PocketTopo | Export for PocketTopo and VisualTopo |
| KML | Export of the survey shots for Google Earth |
| GPX | Export of the entrance coordinates |
| GeoJSON | Export of the survey shots as GeoJSON |
| DXF | Export in DXF format (plan, extended profile or 3D lines) |
| QR code | Export of the QR codes for the selected caves |
Error checking & correction
Detecting errors
To check your data:
- Click on Data → Calculate → Calculate
- Faulty fields are highlighted in red
- Move the mouse over the red field – the error message is shown as a tooltip
- In addition, the column ID is highlighted in red in every faulty row – this way you recognize errors even when the faulty field is further to the right, outside the visible area
Common errors and solutions
| Error | Cause | Solution |
|---|---|---|
| Reference point not found | RefPassage/RefStation do not exist | Check the passage numbers and stations |
| Difference in depth greater than the length | No angle of inclination can be calculated | Check the length measurement or the inclination |
| Hull not in the range 0 to 3 | The field Hull contains an invalid value | Choose a value from 0 to 3 from the selection list |
| LRUD not in the range -3 to 3 | The field LRUD contains an invalid value | Choose a value from -3 to 3 from the selection list |
| Instrument not defined | The instrument number does not exist in the properties | Define the instrument in File → Properties → Instruments |
| Level not defined | The level number is not defined | Define the level in File → Properties → Levels |
| Date not filled | The date is missing for a survey shot or a splay (reference points and cave connections are not checked) | Enter the survey date |
| Surveyor not defined | The surveyor number is not defined | Define the surveyor in File → Properties → Surveyors |
| No reference point or cave not defined | The cave is not connected to a reference point | See connecting caves |
| Further reference point without coordinates | A further reference point without a RefCave has X, Y and Z = 0 and therefore lies at the origin of the cave | Enter the coordinates X, Y, Z, connect the reference point to another cave via RefCave, or attach it to a survey station via RefPassage/RefStation |
Filtering faulty records
To see only the faulty records:
- Data → Rows → Errors
- Only records with errors are displayed
- You can then correct them one by one
A sample file with faulty records to try this out is included: Demo Fehler.xml.
Editing survey data in Excel
The survey shots of the selected caves can be edited in Excel:
- Data → Excel → Edit – the survey shots are handed over to Excel
- Edit the values in Excel and save the file
- Data → Excel → Load – the survey shots are loaded from Excel and overwritten
CaveRenderPro.xls controls the exchange with Excel and must not be modified.
Tips & tricks
- Undo/redo:
Ctrl+ZandCtrl+Yalso work in the datasheet - Adjusting columns: Data → Columns, to display only the fields you need
- Bulk operations: with Data → Values → Replace you can change values en masse
Ctrl+S! CaveRenderPro does not create an automatic backup.
Next steps
Now you have entered data. The next step:
- Calculation & quality - calculating and adjusting survey shots